私の家族と私が家屋敷に引っ越した最初の夏、私たちは岩だらけの野生の土地に庭を作ることができませんでしたが、どういうわけか素晴らしい秋の収穫があり、たくさんの乾物を瓶に集め始めました.これはどのように可能でしたか?驚くべき一言…どんぐり。
ビデオを見る:
それが樫の木の種であることを知らなくても、ほとんどの人はどんぐりを見分けることができます。秋の装飾、枕カバーのモチーフ、ジュエリー、工芸品で使用されているのを見ることができます.サマー キャンプの子供たちはキャップを口笛に使用し、造園家は毎年秋になると、バケツ一杯のナッツが手入れの行き届いた芝生に降り注ぐので、イライラして目を転がします。しかし、どんぐりがどこにでもあるにもかかわらず、栄養価が高くて食べられるという事実は、現代の西洋文化にはほとんど完全に欠けているという事実です.
毎年秋になると、街の通り、田舎の敷地、裏庭、歩道に文字通り大量の無料の食べ物が落ちていることを考えると、この事実は、持続可能な食べ物に興味のある人なら誰でも大きな立ち止まりを与えるはずです!
採餌者にとって、どんぐりは大きな希望の象徴です。深い森から都会の公園まで、すべての樫の木が食料源として頭の中で輝き始めると、世界が違って見えます。どんぐりが私たちの食生活の重要な部分になるべきだと示唆するのは奇妙に思えるかもしれませんが、それは、私たちの多くが、私たちの祖先がかつてこの広く入手可能なナッツで生活していたという事実を知らないからです.そして、私たちはまだできます。したがって、どんぐりを探して食卓の食べ物に変えるとき、あなたは古代の方法の美食の復活に参加し、何十万人もの人々がかつて知っていた何かのほこりを吹き飛ばしています.
この記事では、どんぐりを美味しく食べられるようにするための私なりの加工法をご紹介します。私はオフグリッドの農家に住んでいるので、電気を使用せずにこれらすべてのステップを手動で行う方法を見つけました。また、プロセスの途中で安定した保管を行う機会が複数あります (正直に言うと、人生は時々いっぱいです)中断の!)。少し時間がかかりますが、興味がありやる気のある人なら、派手な機器がなくてもこのプロセスを完全に実行できることを知っておいてください!
以上のことを踏まえて、毎年秋に降る驚くべき無料の恵みを、あなたとあなたの家族のために信頼できるおいしい食べ物に変える方法について詳しく学びましょう.
どんぐりには歴史があります
どんぐりを食事の重要な部分として使用するという考えは、新しいものではなく、まったく冒険的なものでもありません.それは、ほとんど忘れ去られたものだと思います.
持続可能なでんぷん質の主食としてのどんぐり
私が最初に真剣に採餌を始めたとき、どんぐりは私にとって大きな焦点になりました.どんぐりは、単なる「トレイルサイドの軽食」ではなく、いくつかの文化で主食として使用されており、保存が容易で、でんぷん質の基礎を食事に提供しています。スペインからイタリア、北アフリカ、韓国に至るまで、世界中のさまざまな国の美食用語集の重要な部分としてどんぐりを見つけることができます.そこでは、どんぐりをローストしたり、どんぐり油に浸したり、どんぐりドリンクに醸造したり、豆腐のようなどんぐり「ゼリー」に調理したりすることができます。
海の私たち自身の側では、それらはいくつかのネイティブアメリカンの国にとって重要な食料でした.先住民族は、海岸から海岸までどこでもどんぐりを栽培していましたが、特にフーパ、カロック、ミウォック、ポモ、ユロックなどの北カリフォルニアのどんぐりを使用していました。彼らはどんぐりを食事の絶対に重要な部分として使用しました.自給自足に関心のある人にとっては、ここが興味深いところです。とうもろこし、米、じゃがいも、キビ、小麦など、でんぷん質の主食作物を中心に食文化の大部分が集中していることはおそらくご存知でしょう。しかし、人々がこれらの主食に依存するためには、農業的なライフスタイルを生きなければなりません。カリフォルニア州北部のコミュニティは、特定の場所でドングリを栽培することに 1 年を費やすのではなく、ドングリを収集して加工するための価格で、でんぷん質の主食の必要性を満たしたため、農業以外の生活を維持できたという点で独特でした。
もちろん、私は偽善的に農業を否定しているわけではありません!しかし、植える必要も世話をする必要もない木から豊かで栄養のある収穫を得る可能性を理解するのに役立つことを願っています.この食品は、入力を必要とせず、太陽と雨の中で自然に得られるものであるため、非常に持続可能な栄養源であることは間違いありません (5 倍速いと言います)。あなたがいつか自給自足を求めている農家なら、どんぐりは土地から重要な栄養源を引き出す機会を与えてくれ、自家栽培の食料ポートフォリオに安定した多様性を加えます.そして、何エーカーもの土地を持っていなくても、他の誰も自分の食事資源をこれ以上コントロールしたくないドングリを簡単に集めることができます.
毎年秋に歩道に降るどんぐりを、足首をひねる煩わしさではなく贈り物として見る人が増えたら、その影響を想像できますか?私たちの食生活を、工業化された巨大な一年生の食用作物だけに依存するのではなく、大規模な栽培には適さない地域でもうまく育つ、大部分が自己維持型の多年生の食用作物に食生活を開放したらどうなるでしょうか。それは私たちの管理外ですか?確かに、それは考えの材料です。どんぐりは工芸品や装飾モチーフ以上のものであり、アメリカで最も活用されていない食料資源の 1 つかもしれません。
とはいえ、アメリカの風景のどこにでもある樫の木は、どんぐりを、採餌に興味があるなら学ぶべき最も重要な野生の食物の1つにしていると思います.私たちが学ぶ他のほとんどの食品は、ダイエットの構成要素ですが、どんぐりは、実行可能な基盤になる可能性があることを私が発見した唯一のものです.それでは、このナッツを夕食に変える基本を見てみましょう!
パート 1:豊富な収穫のための採集
この旅は、サミュエル セイヤーの採餌に関する本を読むことから始まりました。
関連記事: 裏庭の「雑草」から癒しの軟膏を作る方法
採餌者の収穫 、自然の庭 、信じられないほどの野生の食用 野生から栄養を集めることの実際的な側面について真に学ぶことになると、これらは不可欠です.
セイヤーは、彼が話す植物を研究するだけではありません。彼は毎日それらを食べ、同じような本当の理解を持って書いています。彼の最も愛されている野生の食べ物の 1 つはどんぐりです。彼の記事を読んだ人なら誰でも、できるだけ早く試してみたいと思うでしょう!
どんぐりの見分け方
私が採餌を始めたばかりの人々と話すとき、彼らは間違いなく、植物を誤認して自分自身を中毒させることへの恐怖を共有しています.多くの人々が最初に採餌を試みるのを止めたのは理解できますが、過度に膨らんだ恐怖です.危険な植物はほんの一握りしかありませんが、実際には、はるかに無害で有用な植物が存在します。そして、どんぐりの収穫に関して言えば、どんぐりはとてもフレンドリーです。危険な似たようなものはありません。それらは、上部を覆う独特のキャップを持つ北米で唯一の木の実です。基本、どんぐりに見えたらどんぐりです。採餌初心者が誤認する唯一のことは、殻付きの野生のヘーゼルナッツをキャップのないどんぐりと間違えることだと思いますが、ヘーゼルナッツは美味しく食べられるナッツでもあるので、明らかに脅威ではありません!
何十種類ものオークの木のそれぞれがどんぐりを作ります。他よりも大きいものもありますが、加工すればすべて食用になり、役に立ちます。遭遇する可能性が高いオークには 2 つの主要なグループがあります。 レッド オークは油分が豊富で苦味の少ないナッツで、乾燥が速いのです。
採餌者に関する限り、オークの特定の種を識別することは、赤いドングリと白いドングリの違いを識別できることほど重要ではありません。一般的なガイドラインを次に示します。一般的に(ただし例外はありますが)レッドオークは葉が尖っており、ホワイトオークは葉が丸みを帯びています。レッドオークのどんぐりは内側が毛羽立った殻を持ち、ホワイトオークのどんぐりは内側が滑らかな殻を持っています。レッドオークのドングリにはうろこ状のキャップがあり、ホワイトオークのドングリには毛むくじゃらのキャップがあります。それらの鍵とバックアップとしてのツリー ID ブックがあれば、期待に満ちた素敵で大きなオークを見つけたときに、何を扱っているかを確実に把握できます。
どんぐり集め
どんぐりは夏の終わりに地面に落ち始め、秋まで落ち続けます。秋の暴風雨と暴風雨は、樫の木からそれらを打ち負かすのに本当に役立ちます。あなたの所有地の構造物のいずれかにトタン屋根がある場合、雹のように雨が降るので、収穫期が到来したことを本当に知ることができます!
ただし、どんぐりを集め始めるのに最適な時期は、どんぐりが落ち始めたときではありません。オークには、どんぐりを落とす段階が 2 つあります。オークの木がどんぐりで滴り落ちていることに最初に気づいたときは、ナッツを集める時ではありません。もしそうなら、ほとんどすべてが悪いことに気づき、信じられないほどがっかりするでしょう.いくつかの幻想的に設計された、説明のつかない方法で、オークの木は、どのナッツがうまく成長していないか、または昆虫に感染しているかを知っているため、価値のないナッツをできるだけ早く取り除きます.これらのどんぐりの多くは、熟していないか、発育が不十分であるか、またはキャップがしっかりと付いています (悪いナッツの確実な兆候です)。
これは注目すべき 2 番目のドロップで、通常は 10 月に発生します。これらのナッツは良いものです!確信が持てない場合は、石で数個のどんぐりを割ってテストすることもできますが、通常、2 回目の落下で集められたどんぐりの約 90% は完全に完璧であることがわかります.
もちろん、すべての人が秋のすべてを監視するために樫の木の列の贅沢を持っているわけではありません.では、地面に敷き詰められた良いナッツと悪いナッツの違いをどのように見分けることができるでしょうか?どんぐりの X 線視力を持っている人はいませんが、できるだけ多くの良いものを集めるために、野外で使用できる兆候がいくつかあります。
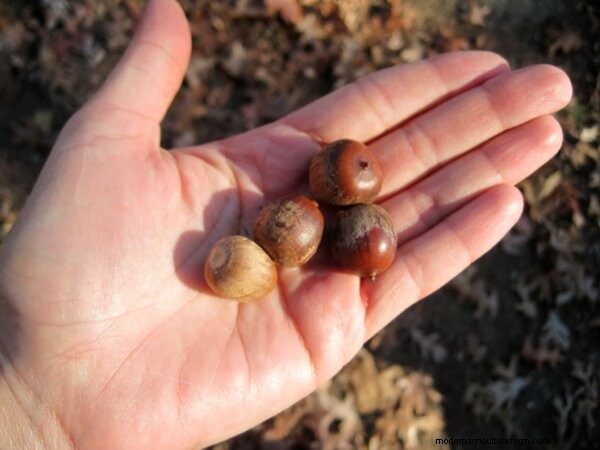
良いどんぐりは見た目も良く、手に持つと重く感じます。それらは通常、磨かれた木材のように少し光沢があり、上部にきれいな黄褐色の円盤があります。
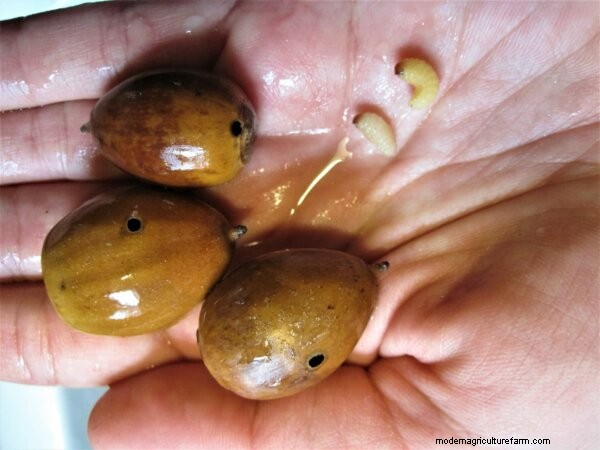
悪いどんぐりにはさまざまな形があります。避けるべきものは次のとおりです。変色したどんぐりや側面に黒い斑点があるものは良くありません。キャップ付きの小さめのナットは早く落としてしまい不良です。ディスク上の変色した斑点も、悪いナッツの指標です。キャップのついたままのどんぐりはダメです。風化して鈍く見えるどんぐりは、おそらく昨年のどんぐりで、通常は腐っています。最後に、側面に小さな穴の開いたどんぐりは、すでにどんぐりゾウムシの幼虫に食べられており、糞でいっぱいです。ちなみに、これらの小さな幼虫に慣れてください。後で詳しく説明します!
覚えるのが大変そうですが、良いどんぐりと悪いどんぐりを知ってしまえば、野外で拾い集めながら、ほとんど本能的に区別できるようになります。時間をかけて良質できれいなナッツだけを集めようとすることで、後で多くの手間を省くことができるので、努力する価値があります!そして、暖かい初秋にどんぐりが心地よくバケツに飛び散る中、まだらの太陽を楽しむのは本当に楽しい仕事です.
ナッツを集めるという点では、手作業で行うことを心からお勧めします。ナットピッカーアッパータイプのツールがありますが、それらは無差別であり、良いナット、悪いナット、ロック、またはボトルキャップの違いを見分けることはできません.ナッツを拾うために節約した時間は、拾ったジャンクを分類するために失われます.どんぐりを採餌して数年経った後、最も単純なアプローチが常に私にとって最善でした.手と 5 ガロンのバケツが最適です。
パート 2:運搬の処理
家に持ち帰り、乾かす
どんぐりを集めるときは、赤と白のどんぐりを別々のバケツに分けておくことをお勧めします。そうすれば、できるだけ早くホワイトオークどんぐりを割って処理することができます.ホワイトオークどんぐりは水分を多く含んでいるため、山積みにしておくとカビやすくなります。そして、どんぐりの収穫を選別して乾燥させるのをあまりにも長く延期すると、ナッツのキャッシュ全体が青カビの臭いの山であることに気付くだけで、非常に残念です.レッドオークのどんぐりもバケツに無人で置いておくべきではありませんが、単層に広げて、作業する準備が整うまで殻の中で簡単に乾燥させることができます.
というわけで、これらのナッツを乾かすことについて話しましょう!
それらをすぐに割って処理できない場合は、少なくとも、空気が循環できる場所に単一の層で平らに配置します.これは、太陽熱脱水機に改造された冷蔵庫で行います。それが欠けている場合は、乾燥した場所にシーツを広げたり、いくつかの古いベーキングパン(古着屋で簡単に見つけることができます)でも、ナッツの殻をむくことができるまでは問題なく機能します.また、ドングリ ゾウムシの幼虫がナッツから抜け出すとすぐに出現することに注意してください。いくつかの見栄えの良いナッツでさえ、小さな汚れたナッツ破壊者に密かにホストされています.
幼虫を捕まえよう!
幼虫は、他のどんぐりに再感染することはなく、刺すこともありません。あなたがそれらを御馳走として与えるならば、すべてのヒエの家禽はそれらをおいしそうに食べます.動物のクリーンアップクルーがいない場合、グラブの唯一の欲求は地面に戻って蛹になり、来年のドングリの収穫に感染できることに注意してください.選択したオークの木から離れた場所に処分するのが最善かもしれません
この時点で、ストレージに関するいくつかのオプションがあります。レッドオークのどんぐりは、殻ごと乾燥させてから、次に進む準備ができるまで清潔な 5 ガロンのバケツに入れておくことができます。それらが完全に乾くまでに数週間かかる場合があるので、急いではいけません.ただし、シェルにホワイトオークのどんぐりを保管しないことをお勧めします.保管する前に、ひびを入れ、殻をむき、乾燥させる必要があります。これにより、次のステップに進みます。殻を取り除くことです!
どんぐりを割る
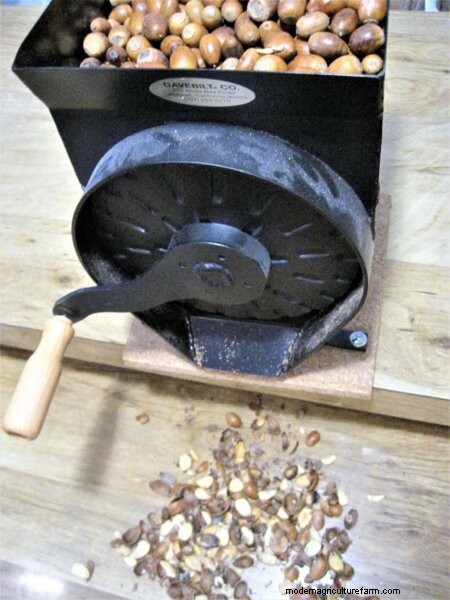
There are several options when it comes to cracking loads of acorns. It can be as simple as smashing them open with a hammer on a flat surface, Layering them between two towels and whacking them with a mallet, or as sophisticated as buying a specialized nut cracker for the purpose. But if you are really interested in making acorns a part of your diet, I heartily recommend the Davebilt nutcracker as a huge, huge time saver. Hand-cranked, made in America and built to last, this is a solid tool that you’d be able to pass on to your kids, and is good for most any type of nut. It runs close to $200, but I can personally attest that the time and effort saved made it worth the price within our first season of using one.
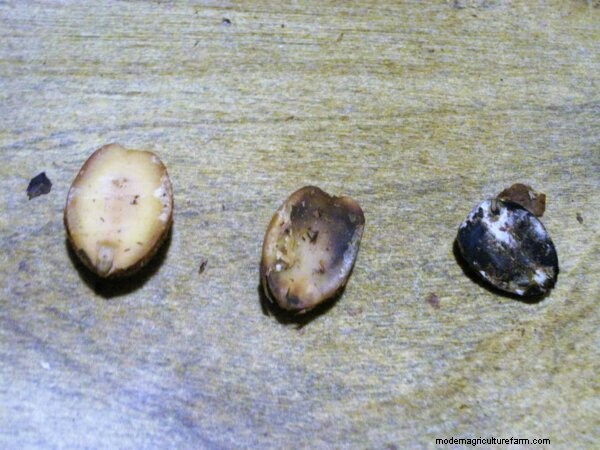
I do the bulk of my sorting after cracking acorns. Separating the nutmeats from the shells is a good activity to do with a friend and conversation, some good music, or a group of competitive children. You’ll soon see that its inevitable that some bad acorns will ride along with the good ones, but once they’re cracked open, the good is super-easy to separate from the bad.
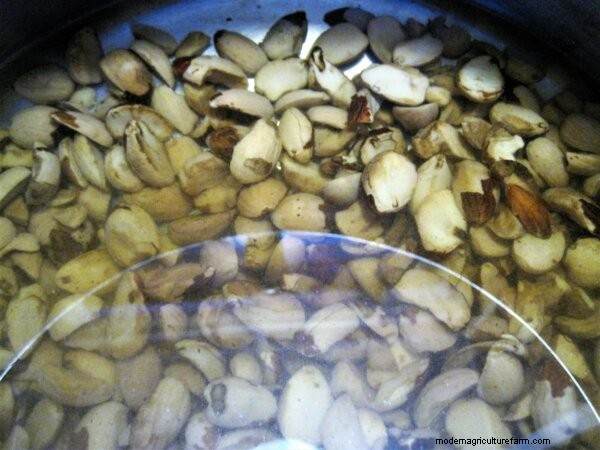
Any that are moldy, had clear evidence of being nibbled by bugs, or were covered with dark spots can go into the chicken/compost bucket, and all the tan, waxy-nice nutmeats can either be dried for later processing, or moved on to the next stage. If you find that a lot of your fresh, red oak acorns look good but aren’t coming out of their shells, save yourself some frustration and dry them further. Prying red oak nutmeats out of the shell is incredibly frustrating, but they’ll simply drop out of shells once completely dry.
While sorting, you’ll find lots testas (the dark brown, papery coating over the nut) also come off. Some resources say that you must remove every trace of the testa to have tasty flour, but I found that it really didn’t make a difference.
That pile of nutmeats can now be dried until they’re rock-hard and stored for later processing. This is a wonderful feature of the dried nuts–they can be stored for a while. During years with a very heavy acorn crop, you can stock up on nuts to give you a cushion for when there’s a poor crop season. So at this point, you can put your harvest into secure storage or move them on to the next step–leaching!
Leaching The Acorns
Leaching is the process of using water to remove the bitter, water-soluble tannins from the nuts and make them palatable. It’s possible to eat a single acorn raw with no ill effect, but I don’t know if you’d want to repeat the experience.
There are three types of leaching–cold leaching, chemical leaching, and hot leaching. I’ll only be detailing hot leaching here, as it is the most beginner-friendly and yields results quickly and satisfyingly. If you really get into working with acorns, however, be sure to investigate the other processing methods in the resources at the end of this article–each results in a distinctively different product.
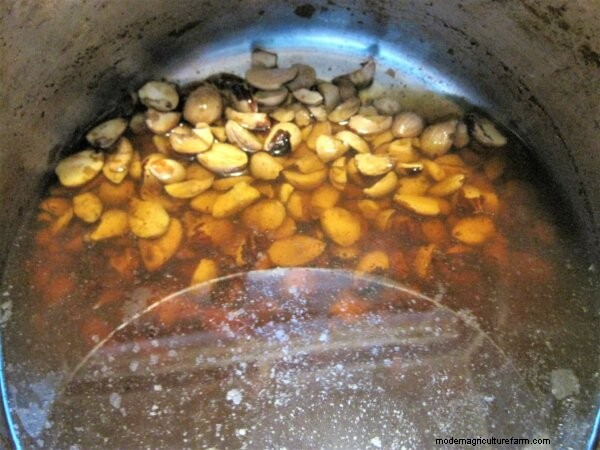
Hot leaching acorns is simple–put the acorns in a pan of water, heat it to boiling, drain off the dark-brown water, and repeat until a sampled nut no longer tastes bitter. You can do this on a conventional stove top on a rainy weekend, but it’s a lot easier and uses a lot less energy if done on a wood stove. The various species of acorns take anywhere from three to ten water changes to have a sufficient amount of tannin removed–you’ll have to judge for yourself when they’re ready. When they taste sweet, somewhat maple-like, and not at all bitter, consider them done. Some resources say that you need to wait until the water runs clear, but it’s not necessary. Taste is more important than looks.
Grinding The Acorns
Now that the acorns are leached, its time to turn them into flour–you’re almost there, hungry forager!
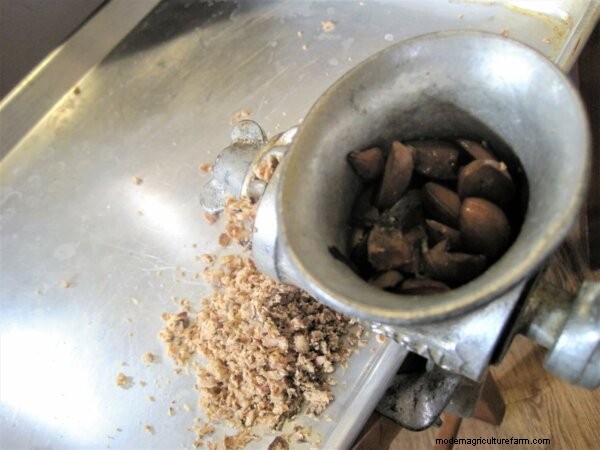
My method is to run the damp, leached acorns through an old-fashioned, hand-crank meat grinder. They’re really easy to find at antique markets and thrift stores–the one pictured here was only $4!
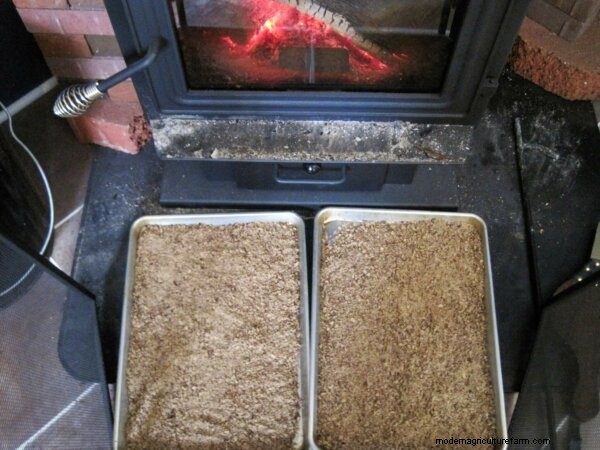
Spread the damp nut meal back on a cookie sheet and allow it to dry completely. If you have a wood stove, place it at the the base and stirred occasionally until it is bone-dry–this will take two days or so.
You can also do this in a dehydrator or in a conventional oven at 170 degrees Fahrenheit until the meal is bone-dry. Don’t rush this part! If you store the flour even slightly wet, it may mold and all your hard work will end up in the compost pile.
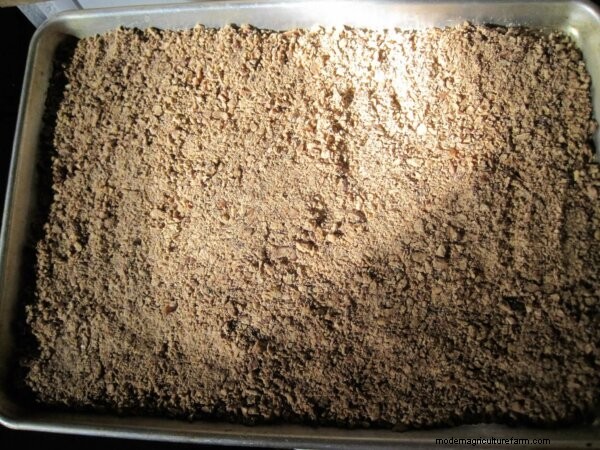
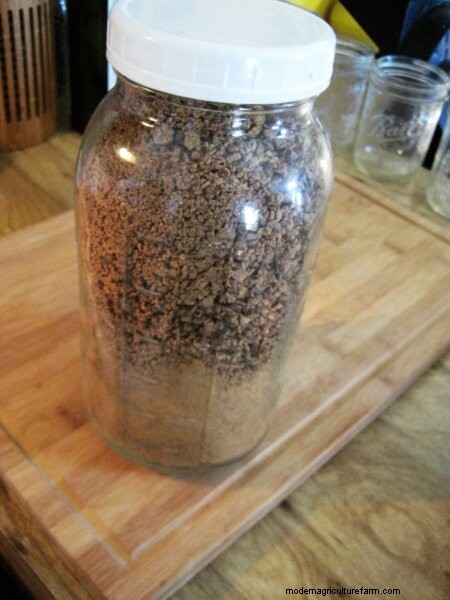
The end result will be a very coarse flour. This can be used as-is, or it can be run through a flour mill or coffee grinder to produce finer flour for baking. Either way, you can now store it in an airtight container and use it at your leisure!
It’s finally ready! By this point, you are undoubtedly hungry, and rightly so. Let’s look into some delicious uses for this food.
Part Three:Cooking with Acorns
As an ingredient, you can think of hot-leached acorn flour in a vaguely similar way to cornmeal. With no gluten to hold it together, it won’t form a springy, bread-like dough on its own, but don’t let that stop you from experimenting with eggs, mixing it with wheat flour or some other starch, or seeing what can be done to let it shine as an ingredient in its own right, rather than just an inclusion.
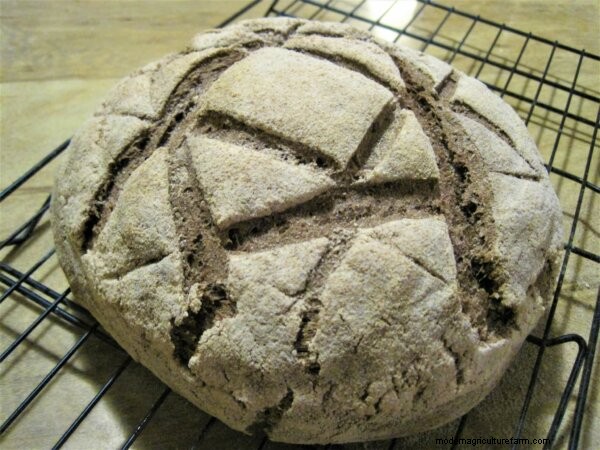
Taste-wise, acorn flour is nutty, earthy, sweet, and reminiscent of maple or molasses. The hot-leach method results in a dark brown flour that will give a pumpernickel-like color to whatever you mix it in. So with all those factors in mind, let me share some ideas on how to make it into delicious food!
Acorn Sourdough Boule Recipe
Ingredients
- 3/4 cup sourdough starter
- 1 ½ cups warm, filtered water
- 1 teaspoon salt
- 2 cups whole-wheat flour
- 1 cup finely-ground acorn flour
(Note:The amount of flour you need to use varies depending on the day’s humidity. I find that I use far less flour in the summer than I do in the winter.)
Directions
<オール>
Add sourdough starter and filtered water to a large bowl. Mix thoroughly with your hand.
Add salt, then flour, one cup at a time, and continue to mix with your hand. The dough should be wet. If it is dry or hard to work with, add more water.
Let the dough rest 10 minutes.
Wet your hands and knead the dough in the bowl. It may seem counter-intuitive, but whole wheat needs to be kneaded with water, not flour. Trust me on this one! Knead the dough in the bowl for 4 minutes, wetting your hands as necessary to keep the dough from sticking. If it is hard to knead at this point, you’ll want to introduce more water, about a teaspoon at a time, until it is workable. It’s okay if it feels slightly “too wet.” It will soak it up, guaranteed.
Allow to rest another 5 minutes.
You’ll probably notice that the dough is now smooth, supple, and not as sticky. Form into a round, cover with a towel, and put someplace warm for the next four hours.
The dough should have risen quite a bit during this time. Punch down, then gently shape into a round ball by pulling the edges into the center.
Line a large bowl with a linen towel, then dust the dough liberally with flour. Lay the dough in the bowl and put back in the warm place to rise again for at least 2 hours.
Preheat your oven to 475 degrees Fahrenheit.
If using a baking sheet, both grease and scatter flour over the surface before gently flipping the bread onto it. If using a pizza stone, dust your pizza peel with flour before turning the bread out onto it.
With a sharp, serrated knife, score the top of the bread to allow for expansion during baking.
Slide the bread into the oven and bake for 15 minutes.
Lower the temperature to 425F° and bake another 20 minutes.
Your bread is done if the internal temperature has reached 200F°. You can check with a meat thermometer or use the traditional method of tapping the bottom and listening for a hollow sound.
If you can resist the urge, allow the bread to cool on a wire rack for 15 minutes before slicing so that it can finish internally steaming.
Serve with butter and a fruit preserve.
Once cool, wrap in a towel and store in a cool, dark place. It should stay good for about 4 days.
Other Acorn Recipes:
Acorn Porridge by Adam Haritan
Porridge deserves more time in the limelight as a delicious breakfast option. Simmer a cup of coarse acorn flour in two cups of water, or make a 50/50 mix with coarse-ground wheat or other grains for a nourishing start to the day. Add a pinch of salt, a handful of raisins, and a knob of butter to make it something special.
Acorn Pancakes
Served with a side of wild berries and a drizzle of home-tapped maple syrup, you can prove to both yourself and your breakfast guests that wild food is the best food in the world.
Acorn Coffee
Roasted until fragrant and simmered for 15 minutes, coarse-ground acorn flour can be brewed into a rich, coffee-ish drink that is comforting on its own and delectable with some sweetened, spiced milk.
This is just a tiny sampling of all the possibilities that await the home cook with a jar full of acorn flour. This fall, I hope you take the chance to forage, process, and truly enjoy this amazing, free ingredient! And if you have your own recipes for acorns, please don’t hesitate to share them.
One Last Idea
I want to offer one more idea for the homesteader looking to utilize wild food to it’s full potential–it’s a great feed supplement for many of our animals. My ducks, chickens, and goats have all relished eating acorns and acorn grubs in the fall. The ducks and goats can handle them raw and unshelled as they fall from the tree, but the chickens need them smashed before they can get the nutmeats out. I have no experience with feeding them to other livestock, so my knowledge is limited to the effect on cows, sheep, or horses. All the same, acorns offer another self-sufficient option to the homesteader hoping to provide for their animals needs directly from their own land, rather than being entirely dependent on the feed store.
Resources
If you’re interested in the best foraging books in the world, you need to check out the work of Samuel Thayer. His book Nature’s Garde n has the most thorough, useful, and insightful write up on acorn foraging that I’ve found anywhere, with far more information and recipes than what I’ve presented here.
Hank Shaw is another name for those interested in foraging to remember. His recipes using acorns are positively amazing-looking.
Another place worth investigating is this excellent post by another homesteader also turning acorns into a diet staple for her own family. Practical Self-Reliance is full of excellent ideas, including acorn pasta and acorn cheese!
For those foragers out there closer to the foodie side of the spectrum, Pascal Baudar is your man. He has been transforming wild foods into super-fancy epicurean delights with a fervor that needs to be seen to be believed. Some of his creations may be more complicated than is practical for everyday fare, but if you’re looking for inspiration, he’s a great source of it.